watonomous.github.io
[ Electrical Division : Camera Setup ]
Created by [ Rowan Dempster], last modified by [ Frank Yan] on Mar 30, 2020
Table of Contents
Document Abstract
- This document contains information about how to setup, debug and use cameras deployed on the vehicle. In year 3, we intend on using 3 BF (IMX249) cameras.
- [This document provides some helpful debugging techniques if you're trying to bring up the cameras, as well as some information on persistent IPs and how we use them.]{.inline-comment-marker data-ref=”edeccd2b-0c68-479d-90bc-6bd429c68c95”}
Wiring
***ToDo (Rohit): Insert diagram detailing physical wiring with PoE boxes.***
Networking
Persistent IP Context
- Cameras have persistent IPs that can be manually configured through
FlyCap2 or Spinnaker GUIs.
- A persistent IP means that the camera's interface has the same IP address between power cycles.
- We do this so that our computer can immediately connect to the cameras when the system boots up.
- Without persistent IPs, the default IP might be something [non-deterministic (either DHCP or LLAC),]{.inline-comment-marker data-ref=”d02ae38c-5dd3-4b9a-a12d-762384039766”} depending on the configurations.
- Use this link for instructions on how to set persistent a IP.
- To verify the IP is persisting:
- Power cycle the camera. ***ToDo (Rohit): Explain how to do this in more detail***
- Inspect the registers with the GUI. ***ToDo (Rohit): Explain how to do this in more detail***
Persistent IP Configuration
-
Currently, our cameras have the following IPs (network masks should be /24 ):\
Position Model Serial IP address Right BF 17453317 169.254.0.30 Left BF 17353304 169.254.0.31 Center BF 18542606 169.254.0.32 ———- ——- ———- ————–
Verifying Camera Connections and Persistent IPs
-
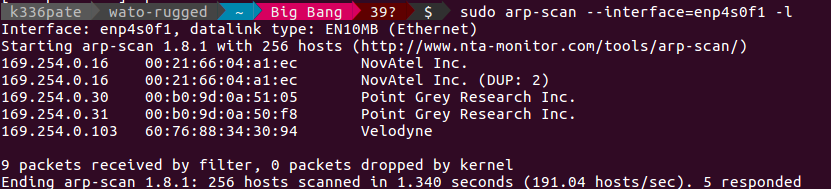
To confirm that the rugged can connect to the cameras, run the following command:
$ sudo arp-scan --interface=enp4s0f1 -lThe expected output should be:
[
 {.confluence-embedded-image
height=”150”}]{.confluence-embedded-file-wrapper
.confluence-embedded-manual-size}
{.confluence-embedded-image
height=”150”}]{.confluence-embedded-file-wrapper
.confluence-embedded-manual-size}
[Drivers
Launching the drivers
- To launch the drivers, do the following:
- Turn on the Rugged. This should automatically power up all the sensors as well. Give it some time to boot up, especially since the 10G switch takes a while to turn on.
-
$ cd /home/autodrive/integrationThis takes us to the integration folder. Here we can find the Rugged's catkin workspace (If you don't know what a catkin workspace is, read some ROS tutorials!)
-
$ source ./devel/setup.bashThis command should automatically execute as it is included in ~/.bashrc
(If you don't know what this command does, once again: read some ROS tutorials!)
-
$ roslaunch pointgrey_camera_driver stereo3cameras.launch left_camera_serial:=17453304 right_camera_serial:=17453317 center_camera_serial:=18542606***[ToDo (Kushant): Ask Kushant if this can now be updated as the old documentation specifies that the centre camera has not been installed yet]{.inline-comment-marker data-ref=”454ebac3-9d0a-4429-8dc0-67c8d808d5ab”}***
The arguments left_camera_serial, right_camera_serial and center_camera_serial values are parameter names that the launch file stereo.launch is expecting. It will use those serial numbers (which uniquely identify each camera) to launch the drivers and to connect to the cameras.
Debugging
Inspecting ROS Data
- After launching the drivers, the following should happen:
- The camera driver nodes will launch and connect to the appropriate cameras.
-
The cameras will start publishing ROS messages over a variety of ROS topics, some of which have been configured with our own custom names (eg. left, right and center). You can inspect the data (it may not be super useful, but it can tell you if the ROS messages are being published, helping with debugging), by running:
$ rostopic list                            # Lists the topics which are being published to
$ rostopic echo <someRosTopic>            # Outputs the data being published to <someRosTopic>
For example, if you wanted to see the ROS messages being published by the right camera, execute the following command:
$ rostopic echo /camera/right/image_colorIf this outputs a bunch of numbers, the camera is likely publishing good data. If this outputs nothing, your camera is not publishing data and you have a problem somewhere.
Inspecting Visual Data
- If you want to see the actual visual camera output that the cameras
are providing, you can use either FlyCap2 or rviz.
- To use FlyCap2:
- Click on the icon located on the toolbar and select the camera that you want to see.
- If the cameras are connected properly and there are no issues, the serial IDs of the cameras should show up upon launching FlyCap2.
- Clicking any of these serial IDs and pressing "OK" at the bottom will load the live feed provided by that camera.
- To use rviz:
- Open a new terminal tab or a new terminal window.
-
Run rviz by using the very simple command:
$ rviz - When rviz launches, press the add button (located in the bottom left window) and select which rostopics you want rviz to display.
-
Relevant rostopics that will visualize data are:
/camera/left/image_color
/camera/centre/image_color
/camera/right/image_color
If you are not familiar with rviz, it would be worth your time to read up on it and practice using it, it is a very handy debugging tool for all of the sensor suite and the ROS aspects of the sensors.
- To use FlyCap2:
Inspecting ROS Data (again, but visually!)
-
Another option is to use the ROS command:
$ rosrun image_view image_view image:=/camera/right/image_colorThis will cause a window to pop up, displaying what the right camera is seeing. You can do the same thing for the left and centre cameras by changing the second-level topic of the ROS topic provided to image:=
Old Documentation
OLD DOCUMENTATION BELOW (old being earlier than 03/30/2020)
This page contains information about how to setup, debug and use cameras
deployed on the vehicle. In year 3, we intend on using 3 BF (IMX249)
cameras.
Wiring
TODO: Insert diagram detailing physical wiring with POE boxes.
Networking
Cameras have persistent IPs that can be manually configured through Flycap2 or Spinnaker GUIs. A persistent IP means that the camera's interface has the same IP address between power cycles. We do this so that our computer can immediately connect to the cameras when the system boots up. Otherwise, the default IP might be something non deterministic, depending on the configurations. See this link (Method 1, Steps 2-3) for instructions on how to set persistent IP. To verify that the IP is persisting, power cycle the camera, and inspect the registers with the GUI.
Currently our cameras have the following persistent IPs. The network masks should be /24.
Position Model Serial IP address Right BF 17453317 169.254.0.30 Left BF 17353304 169.254.0.31 Center BF 18542606 169.254.0.32 ———- ——- ———- ————–
Quick way to confirm if the Rugged is able to connect with the cameras is to run the following command on the terminal.
sudo arp-scan --interface=enp4s0f1 -l
[The terminal should then display the camera IP and MAC addresses.]{.inline-comment-marker data-ref=”b44ae450-eba0-4b3c-9bc0-54119cecc93b”}
[[{.confluence-embedded-image
height=”150”}]{.confluence-embedded-file-wrapper
.confluence-embedded-manual-size}]{.inline-comment-marker
data-ref=”b44ae450-eba0-4b3c-9bc0-54119cecc93b”}
Drivers
To launch the drivers, do the following:
- Power up the Rugged, all sensors should automatically power up too. Wait for the system to finish booting up. The 10G switch takes a while to turn on so be patient.
- cd /home/autodrive/integration. The integration folder in the home directory is where we keep the Rugged's catkin workspace. If you don't know what a catkin workspace is, read some ROS tutorials!
- source ./devel/setup.bash. This should be done in ~/.bashrc. Again, if you don't know what this does, ROS tutorials.
- roslaunch pointgrey_camera_driver stereo3cameras.launch left_camera_serial:=17453304 right_camera_serial:=17453317 center_camera_serial:=18542606. Currently the centre camera has not been installed yet, so just omit centre camera's serial number for now. The arguments left_camera_serial[,]right_camera_serial[, and][values are parameter names that the launch file stereo.launch is expecting. It will use those serial numbers (which uniquely identify each camera) to launch the drivers and connect to cameras.]
What should happen:
- The camera driver nodes will launch, connect to the appropriate cameras, and start publishing ROS messages over a variety of ROS topics, some of which we have configured with our own names custom names (eg. left, right and center). Use rostopic list, and rostopic echo to inspect not very useful data.
- To visualize camera output, use either:
- Flycap2
- rviz
To check via rviz, run rviz in a different terminal tab/window. Once rviz has launched, press the add button near the button of the left hand side window to select what rostopics you want rviz to display. The rostopics you are looking for are camera/right/image_color and camera/left/image_color. If you are not familiar with rviz, please read up on it and practice using it because it's a very powerful tool to oversee all of the sensor suite and the ROS aspects of the sensors.
Flycap2 is another tool that can be used to check if the cameras are working. If the cameras are connected and there are no issues, the serial IDs of the cameras should show up when launching Flycap2. Clicking on any of camera's serial ids and pressing "OK" at the bottom will load that camera's live feed.
You can also use the ros command, rosrun image_view image_view image:=/camera/right/image_color to check the cameras. A new window will pop up displaying what the right camera is seeing. Same idea for left and center camera.
\
Attachments:
![]() rsz_arpscan.png (image/png)\
rsz_arpscan.png (image/png)\
Document generated by Confluence on Nov 28, 2021 22:40